You are viewing an old version of this page. View the current version.

    Compare with Current View Page History

    « Previous Version 5 Next »

    Below are instructions on your first steps submitting 3dsmax jobs with Qube!


    Step 1 (First Time Only)

    You will need to have installed the 3dsmax jobtype. If you see a Qube! menu item in the top menu bar, the jobtype is already installed, and you can move to Step 2.

    Installation:
    If you are not familiar with the installation process please refer to the Quickstart section on installing workers, or to Installing Jobtypes. <if this doesn't exist, it should> You will need to select "3dsmax Jobtype" during the installation process .

    Step 2

    Once installed you should be able to locate the "Qube!" menu in 3dsmax

    InApp Location: 

    File menu > Qube! 

    Step 3

    With a scene loaded in 3dsmax choose "Submit Render..." or "Submit Batch Render..." depending on your requirements

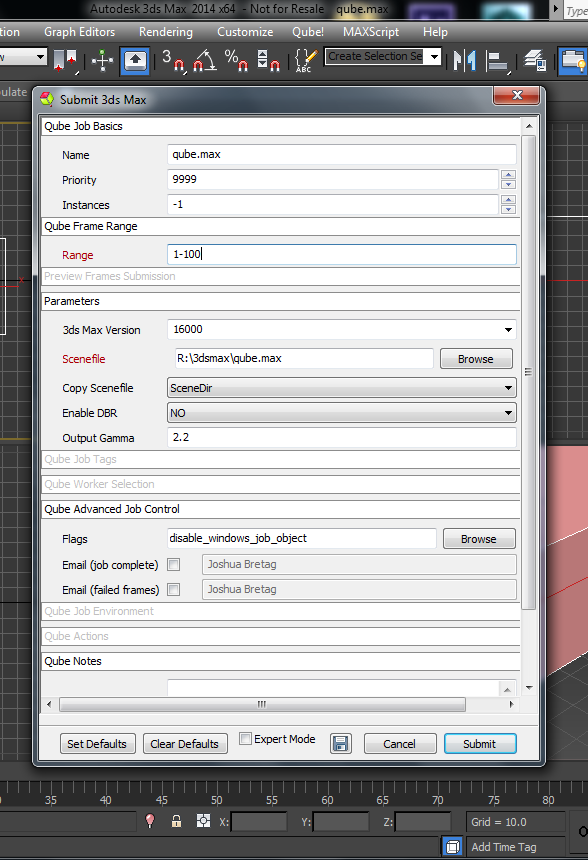
    This will present a pre filled submission UI  

    Step 4

    Ensure sections marked in red have the correct details

    Click submit

    For further details on the submission UI look in the right panel

    Troubleshooting

    If you find you are getting errors here are some useful links for troubleshooting, please first be sure that you've installed max correctly for use on a render farm: Installing and Licensing 3ds Max on a Worker Node

    Troubleshooting Flowcharts 


    Below Is a detailed expandable view of the "3dsmax Job..." Submission UI


    Icon

    Not all sections need to be filled in in order to render only the fields marked in red are required


    Please click on the text below the section of interest

    Detailed Field Explanations:


     Click for Detailed Explanations

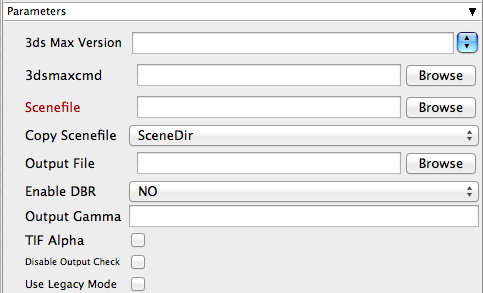
    3ds Max Version

    Tooltip - You may also use numeric version numbers, such as "13000" for v2011, "10000" for v2008, "9000" for v9, etc.

    Icon

    sets the version of 3d Studio Max on the worker

    3dsmaxcmd

    Tooltip - e.g. C:/Program Files/Autodesk/3ds Max 2011/3dsmaxcmd.exe

    Icon

    browse or enter manually the location of 3dsmaxcmd.exe on the workers

    Scenefile

    Tooltip - Path to 3ds Max scenefile (required)

    Icon

    Browse or enter manuall the location of the scene file to be rendered. This is a required field for submission

    Important: Best practise is to ensure the scene file and all of its dependant files such as textures are on network storage accessible by the workers.

    Copy Scenefile

    Tooltip - Whether or not every subjob should create and work with its own copy of the scenefile to workaround a 3dsmax limitation

    Icon

    explanation needed

    Output file

    Tooltip - Output path and filename

    Icon

    Browse or manually enter the location of the output file you wish to generate

    Important: Best practise is to ensure outputs are written to network storage accessible by the workers

    Enable DBR

    Tooltip - Enable Distributed Bucket Rendering for mental ray or V-Ray

    Output Gamma

    Tooltip - if specified, overrides output image gamma value

    Icon

    Manually set the image gamma without opening 3ds Max

    TIF Alpha

    Tooltip - Enable alpha-channel output for TIF format

    Icon

    Manually set the alpha-channel without opening 3ds Max

    Disable Output Check

    Tooltip - Check to disable output file existence and filesize check

    Icon

    Ensure that the 3dsmax filecheck is not enabled

    Use Legacy Mode

    Tooltip - Use legacy mode (required for 3ds Max prior to v2008. Will NOT work for v2013 and above)

    Icon

    Only required if running <3ds Max 2008


    • No labels